7 Tips To Improve Your Drawing (And Painting!)
Anyone can learn to draw. If you can learn to write your name, you can learn to draw. It’s just a matter of learning to see, learning to control a pencil, a little bit of knowledge, and lots and lots of practice. As a child you learned control and accuracy in making the lines, curves, and proportions that form recognizable letters and words. In the same way, with instruction and practice, you can learn to accurately see and draw lines and shapes and values to draw a portrait. Maybe some people have more natural inclination and aptitude for drawing, but skill in drawing is far more a result of persistence and practice than any kind of in-born talent.
Don’t worry that it’s awkward in the beginning! Your handwriting was crude and awkward for the first few years, but probably by now you can dash off an elegant signature without any conscious effort. Just keep drawing and you’ll get there! :)
I want to share with you seven habits I’ve acquired over the years that greatly improved my drawing.
1. Draw with your arm, not just your wrist
Learn to hold the pencil (or brush) at the end, not near the tip. Let the motion come from your elbow and shoulder to make larger flowing gestures. Using your arm rather than your wrist will enable you to make stronger and more elegant curves and lines, rather than jerky, curved, uneven lines. This kind of gesture is very important especially in the beginning of a drawing in order to capture the energy of your subject. This movement will make for a more organic and dynamic rather than stilted drawing.
Working this way may feel awkward for a while. Make yourself practice making free lines, curves, circles, and quick gestural sketches for 5 minutes everyday, until this feels natural. Once you have accurately noted the proportions of your subject and developed the drawing more, then you can move on to smaller details using more wrist and finger movement.
2. Work general to specific
Whenever you begin a drawing, start by lightly marking off the top, bottom, left, and right boundaries of the object or composition you are drawing as well as the centers. (See the examples below.) This will help you avoid one of the worst amateur mistakes: making a composition that runs off the edge of the page or has wildly inaccurate proportions because you started off with a head that was way too big and then had to squish the rest of the body onto the rest of the paper.
Next, “block-in” your composition by simplifying your composition into the most simple shape that will contain all of it. Imagine you are sculpting a bust from a block of marble. Before you can carefully chisel an eye you first have to cut off the corners and large chunks of excess marble until your block is roughly head-shaped. Once you have a general head shape, then you can work on detailing the features.
Work general to specific when drawing, just like you would work to write a good essay or book. To write a cohesive flowing essay, you would make a rough outline of your thesis and the progression of your arguments or ideas before continuing on to the details of each paragraph and sentence. A block-in is an outline for your drawing giving you a framework in which you put all the details so that the whole is cohesive in the end.
Make sure your block-in is accurate before moving on to more and more detail. Stand back and assess it and adjust as needed before moving on. Don’t worry about these construction lines showing in the finished piece; keep them light and they can be easily erased as you progress or just be incorporated into the finished piece.


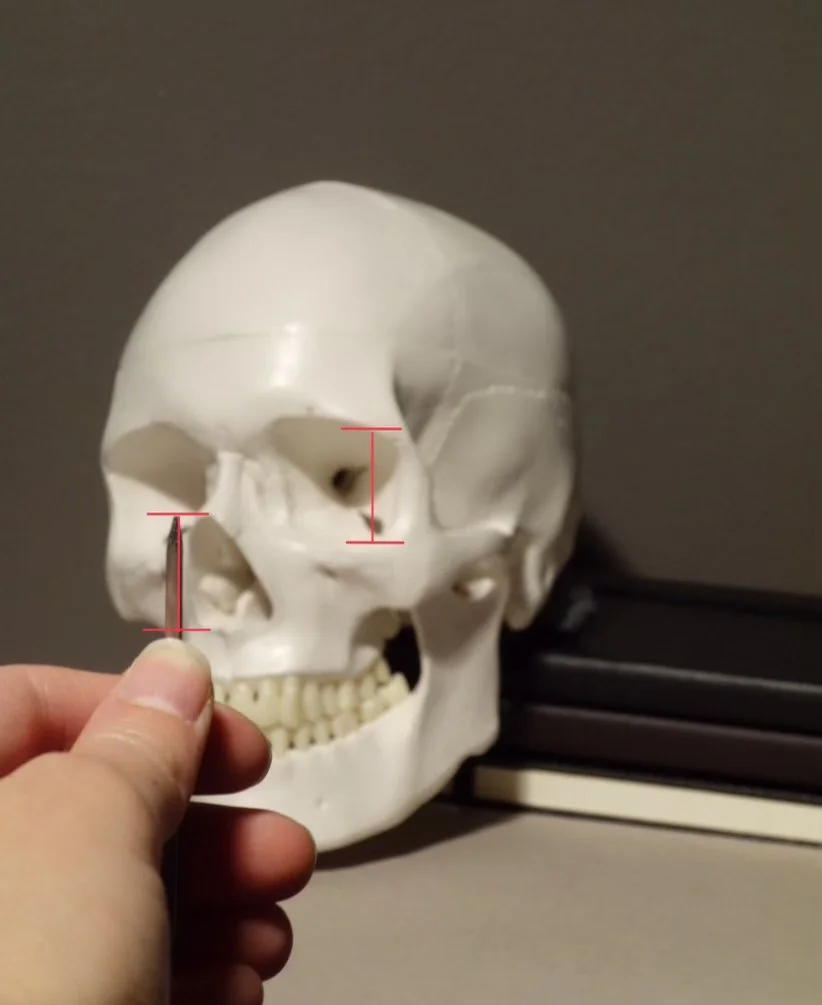
3. Compare distances
This third point as well as the next two are about analyzing relationships. Good drawing requires analysis. Much of the work in realistic drawing is analyzing the relationships between points, lines, and curves. As you work you want to be constantly comparing each part to the rest of the whole so that the whole work becomes a cohesive and accurate composition.
Compare specific distances like the length of the nose, the width of the eye, the width of the mouth, the distance between the corner of the eye and the ear, etc. An accurate way to do this is to actually measure with your pencil. With your arm locked, hold out your pencil (or a knitting needle, bbq skewer, or your paintbrush) in front of your subject. (Close one eye so you don’t see double.) Measure the distance between two points with the tip of your pencil and the tip of your thumb. Then compare this distance to other distances in your subject. In this example I found that the length of the nose cavity was the same as the length of the eye socket. (I also found in the beginning that the hole in the eye socket marked the middle of the width of the entire skull.)
Constantly comparing distances and halfway points as you work will help you achieve accurate proportions.

4. Compare angles
Hold up your pencil or skewer as a plumb (exactly vertical) or level line to evaluate angles in your subject. Examine the angles and then mark the same angle on your page. Examine your subject and find if that angle is repeated anywhere else. In my example, I held up my skewer as a level to find the angle of the cheek bones and identify the tilt of the head.

5. Check alignments and draw through
Another way to compare relationships is to identify alignments. Constantly be asking yourself, “How does this point relate to everything else in the composition?” Ask questions like, “Where is the corner of the right eye compared to the corner of the left eye (higher or lower)? Where is the corner of the eye compared to the corner of the nose (left or right)?” Etc.
Hold up your pencil to find where key points line up, or to determine how much they don’t line up. In this example I found that the right corner of the nose and the left corner of the eye socket lined up almost perfectly.
When you find that two points line up, lightly draw a line to connect them. These structural connecting lines will help you maintain accurate proportions throughout your drawing. (See in the beginning how I lightly drew in curves to connect the eye sockets and note the tilt of the head.)


6. Consider negative shapes
When you’re struggling to get a shape right, try focusing instead on the negative shapes – the shape of the empty spaces in between objects. This gives your brain a fresh perspective and problems will jump out. When you stare at one subject for too long, you start to loose objectivity

7. Stand back
Make sure to periodically get up and look at your drawing from several feet away. This helps you get a fresh perspective to assess your work and notice things that look off. It is easy to get caught up in details and spend half an hour working an eye only to realize when you’re done that the placement of the eye within the whole face was wrong. It can be very discouraging to feel like you’ve wasted a chunk of time and effort and have to erase and rework. The more often you step back and look at the whole picture and not just one small part of it, the more often you can avoid having to rework.
In Summary:
Draw with your arm, not your wrist.
Work general to specific.
Compare distances.
Compare angles.
Check alignments and draw through.
Consider negative shapes.
Stand back.
I hope these techniques and habits will improve your drawing as they did mine!
If you’d like to receive updates about new posts, subscribe to my email list below.
If you’re local to Chicago, consider joining me for a class or workshop. Visit my classes page to learn more and register for classes.